
In this blog post, I will take you through the process of How To Start A Blog And Make Money Online In 10 Easy Steps. Building a website which is accepted by Google and ranked well is not as hard as you may think.
It used to be a nerdy thing to do but these days almost anyone can achieve financial freedom with their own little online empire.
In the last five years or so the website creation platforms which have sprung up such as Wix.com and Weebly.com have revolutionised the process of making websites. Something which used to be tiresome, technically challenging and a bit geeky.
So, what are the 10 steps to making a profitable and long term successful website or blog?
Table Of Content
this is a long article so use these links to jump to where you want to go!
| Step 1 – Choose A Niche Step 2 – Build A WordPress Website Step 3 – Activate Your Plugins Step 4 – Get Website SEO Ready Step 5 – Build The Layout Of Website |
Step 6 – Get A Beautiful Banner Made Step 7 – Get Social Step 8 – Use Imagery Correctly Step 9 – Use YouTube To Captivate People Step 10 – Content Is King |
Step 1 – Choose A Niche
Before you start the actual creation of your blog you need to think what to write about in the first place. Choosing a niche can be tricky because there are quite a few elements to consider.
- Competition
- Profitability
- Popularity
- Research Difficulty
Competition
How competitive your niche is can determine your success from the get-go. You have to do a little bit of keyword research to ensure that there will be enough content and keywords for you too write about which have a low competition ratio.
Once you have a rough collection of keywords, you can Google them and check the Page Rank and Page Authority of the top listed results. If the top 5 results in the SERP’s (search engine results page) have a Page Rank of 40 or more, then I would consider these pages to tough to compete against. You can check Page Rank/Authority with SeoReviewTools.
However, just because you meet some fierce competition does not mean you will not be able to rank. This is just an indication of competition, so DO NOT BE DETERRED altogether.
You have to remember that every keyword can be “Googled” in many different ways so you will have to play around with the keyword phrasing a little bit.
Profitability
The next factor to consider is whether or not the niche you choose will generate any profit. There are thousands of niche ideas out there, but not all of them will be profitable – however, 90% will make you a lot of money.
I think 90% of people will not really need to worry about this issue because we are all consumers, and the majority of us will create websites for items/services which are fairly mainstream – hence profitable.
However, if your niche is VERY particular such as “Ping Pong table dimensions” then you may still make money, but your target audience is MUCH smaller. This also means that your income will take longer to grow and may not be consistent as there is no continuous flow of traffic.
You want to choose a niche which has multiple angles. By that I mean you can write about a lot of different topics within that niche and still be relevant. Such as;
Best Home Workout Programmes – within this niche, you could also write about diet plans, workout equipment and much more because they are all related to the home workout programmes.
Popularity
This one ties into what I already said in the previous two subheadings. You need to choose a niche which people WANT and NEED to find information about.
By using the example as before with the “ping pong dimensions” – you can imagine there will be very few people looking for that kind of information. With that in mind, you have to find the balance between a niche which is specific enough to reduce the competition – but not so specific it kills all popularity.
Research Difficulty
This one is an issue which too many people completely ignore.
All bloggers rely on researching for their blog posts and projects. Why? Because you need facts, figures and general information about the products and services you write about. You are not expected to know everything!
Remember this; you are going to write MILLIONS on words on your website over the coming months and years which means you have to LOVE what you write about. Also, you will be reading about your niche topic even more.
This is why it is essential you choose a niche you love! Otherwise, the research will become too difficult for you because it is going to be mind-numbingly dull to sit and read article after article on an issue which you do not care about.
Step 2 – Build A WordPress Website
If you have never created a WordPress website before then, do not be worried. Building a website is ridiculously easy to be fair. All major hosting platforms like NameCheap and Bluehost have step by step guides on how to create your basic website with WordPress. This usually takes about 2 minutes!
Once you have the basic structure in place, do not worry about “how the website looks” – it will look very basic and empty for the first few weeks. That is normal.
Remember, you have no content yet! Also, it will take you a little bit of time before you discover what road your niche website will take. Inevitably your views and opinions will change – hence the direction of your site will also alter.
With that in mind, do not think too much about the visual aspect of your website yet. This will come later. First, let’s finish your website set-up.
Step 3 – Activate Your Plugins And Create A Basic Structure
The first thing you need to do is activate the All In One SEO Pack. This plugin takes care of the behind the scene SEO magic which happens when Google crawls your website. The process is simple enough.
Activate Your Plugins
At the start; you only need the All In One SEO and Akismet plugins set up.
- Go to Installed Plugins under the Plugins tab (if you do not have the All In One SEO Pack installed then just click on “Add New” and search for it. Then follow these instructions.)
- Click on Activate
- Boom! Done!

The second thing is to activate the Akismet plugin which will stop spam comments blocking up your comment sections. It is 100% FREE so do not worry.
Step 4 – Get Your Website Ready For SEO
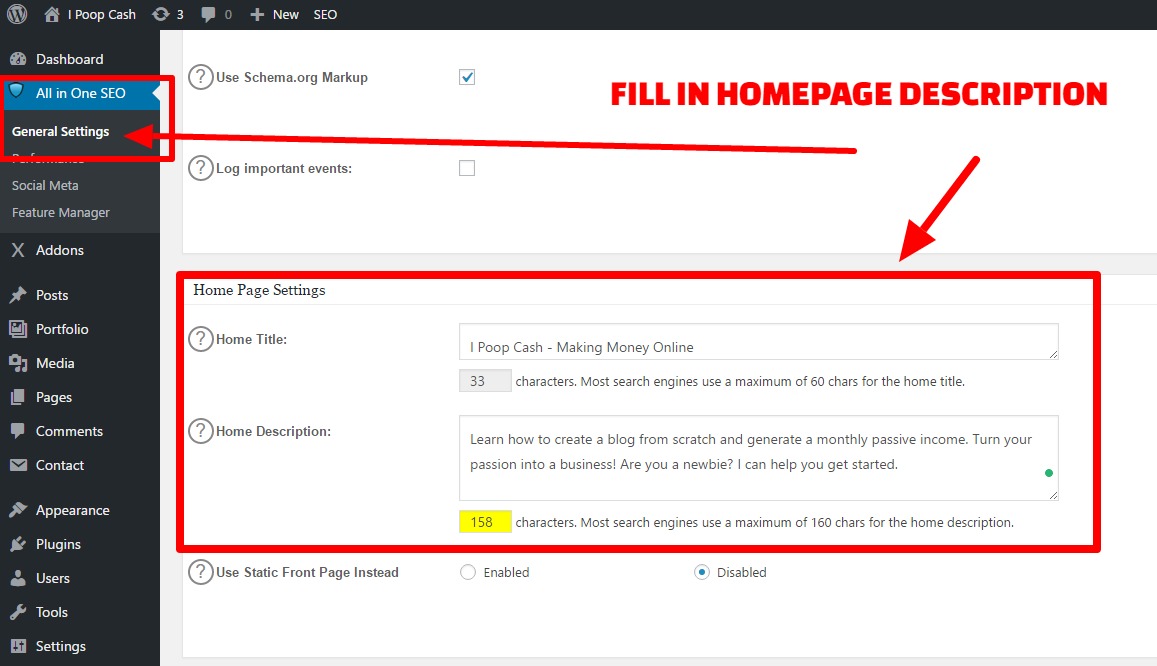
Getting your website ready for SEO is super easy. First up, you need to put in a description of your website in the All In One SEO plugin. See the image below, and all you have to do is click on the All In One SEO plugin and scroll down to the Home Page Settings.
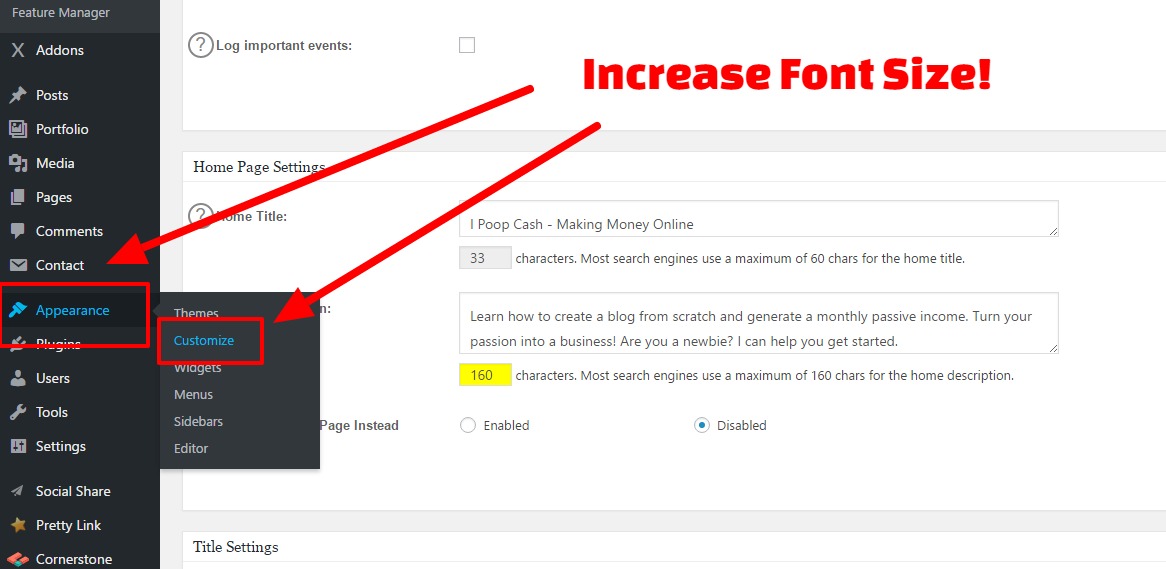
The next step is to ensure your font size is set to 18. This may seem silly, but you have to remember that a large portion of people are using mobile these days. This means the font needs to be large enough for your readers to browse comfortably. This also applies to the regular readers online because a small text is incredibly difficult to read for a long time.
Make it easy for your readership by increasing the font size. Every theme is different, but you should be able to change the font size in your theme customizer.
Important Note
These two steps are all you have to do at the beginning of getting your website ready for SEO. Remember, you have no content yet! This means until you have a lot of articles, and Google have ranked you – you do not need to take any further steps, yet, to make your website more SEO friendly.
Later on, there are many, many things you will have to do in order to make Google love your website such as;
- keyword usage
- a crawlable link structure
- image alt text
- use of videos
- blog post meta description and titles
- and much, much more!
But, for the moment, this is all you have to do.
Step 5 – Build The Layout Of The Website
At this point, you need to create an easy to navigate and appropriate structure to your website. You will need the following pages;
- About Me – Check my about me page, if you need help writing one.
- Privacy Policy – You can copy mine here if you like. Just remember to change my URL to yours inside the body text.
- Affiliate Disclaimer – If you are planning on promoting products through merchants like ClickBank or Amazon.
- 4 Niche Related Pages – Create a foundation to your website with these pages. Use niche related titles such as I have in my menu. My niche is “making money online as a newbie affiliate,” you can see by my menu at the top (under my banner) that they are all related to my niche.
Why Are The Foundation Pages Important?
The initial four foundation pages are important for several reasons;
- They make the navigation of your page easier because the content is relevant.
- Relevant content gives value to your readership.
- The pages will give you a foundation of relevant blog posts to start your portfolio.
- The pages also help Google figure out what your website is all about!
How Should You Arrange Your Menu?
This is a personal preference to be fair. However, you should try and arrange your menu in a clear and transparent way so the reader can easily find their way around your website.
Once you have your basic layout ready, you will always play around with your menu location as your website develops so do not worry too much about “the perfect” layout. Do some Googling and have a look at what other people within your niche are doing and seek inspiration from other sources.
I like to put myself in the mind of my readers and start clicking to see if my menu titles make sense and are in a sensible location. Try and think “what information are people looking for?” and go from there. Make your pages relevant to your niche because that is the information your readers want to find!
Step 6 – Get A Beautiful Banner Made
A good looking banner or header is essential in my opinion when building a site from scratch. There are several good reasons for this;
- A good looking banner gives your website authority.
- Authority builds trust with your readership.
- Plain and simple, a nice header makes your website look professional and awesome!
I recommend using $20 Banner.com – I used them for all my banners in the past, including advertising banners. They have a very quick turnaround, and they are excellent at capturing exactly what you want.
Be sure to include as much information as you can when you give them a job to do – such as font colour, what you want the banner to say, which side you want the picture on, etc.
Step 7 – Get Social!

This step is quite important but also a dangerous one. Being social is crucial when creating a website but, it is also a great time waster.
I think we have all fallen into the trap of “researching” on Facebook when we are supposed to be working or doing other things, like laundry.
Nevertheless, you need to go and create accounts with the following social platforms;
Personally, I am not a big fan of the social platform thing, but the power of these traffic sources cannot be denied, so it is vital that you use these to post all new blog posts, pictures and any other fresh content you produce.
When you share your content they will be liked, shared and pinned by others and it does have the potential to go viral. Especially if your niche is food related or pet related where a simple picture will be liked and shared just because the picture is cute or yummy looking.
One single blog post has the potential to bring in hundreds if not thousands of page views – bear this in mind!
I will not, at this point, go into how to create these accounts with the social websites because that is a whole other story – it is self-explanatory for the most part.
Step 8 – Use Imagery Correctly
This topic created a bit of confusion because it can be daunting to understand which images you can and cannot use on your website. I will include a few links to sources where you can find relevant images to use for FREE.

[x_alert heading=”Before You Use Any Image…” type=”warning”]always check the licence usage of images before you download them. All the free images sources will have a little message under the download button to tell you if it is free or not. 99% will be fine to download, but occasionally you find some pictures which you need to give credit too.[/x_alert]
You can get images from these websites – before you download them you can see if they are free to use on the download page.
I also recently posted an article within the Wealthy Affiliate forum listing over 50 free sources for images. This is worth a look as well.
Once you have found the images, you want to use in your articles and blog posts you need to set it up right. Place the image wherever you want it within your content.
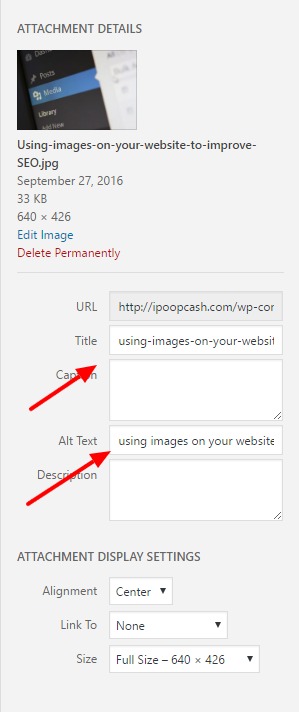
At his point, it is important to put the title and the image alt text on your image. This is important for SEO purposes.
Google can’t see images, so you have to tell the search engines what the images are. So you want to put a title and alt title which tell Google what the image is referring to and also they need to be related to the keyword of your article.
For example;
If you are writing an article about making money online with product reviews, then you can take a screen shot of the Amazon Associate homepage to use in your article with a link to that page.
The title and alt image of that image can be something like “Using Amazon Associate Product Pages For Review.”
This will show Google what the image is showing the reader, and it helps the search engines (Bing and Google) to identify what your article is about.
Step 9 – Use YouTube To Captivate People
Using YouTube is also an epic source of traffic. If you make a video for every blog post you not only create a much more interactive and engaging blog post but you will generate traffic from YouTube as well.
Ranking videos work much on the same basis as a normal blog post. Put the keyword in the title and the opening line of the video description.
A good way to make a video interesting is to basically use the video at the top of the blog post to summarise in depth what the article is about – most people are too lazy to read anyway so you get an added chance to convert readers into buyers.
Personally, I use Screen-O-Matic because it is very cheap and it is very easy and quick to use. The edit options are good too, and it uploads your videos straight to YouTube for you.
A few pointers when making a video for your website;
-
- Invest in a reasonable microphone, such as the Blue Snowball, because there is nothing worse than listening to a video where the audio is really poor.
- Invest in a reasonable webcam or camera like the Logitech C920 – once again if you are doing any kind of video of yourself then you want the quality to be great!
- Record in the highest quality you can – most people now have very good Internet connections so make the quality watchable. Especially if you are doing tutorials where you have to be able to see exactly what is on the screen
- Don’t worry about your voice – no one likes the sound of their own voice on recordings. Just record the video and upload it. Try not to nitpick too much.
Step 10 – Content Is King
This is a BIG one! Your content MUST be quality, readable and valuable to the site visitors. Content is king!
Every single blog post you write must be complete and valuable. Think to yourself “Am I covering everything the topic calls for?” This is a very important question because if you publish an article just for the sake of adding content, then you are not doing it right.
I like to write an article then save it to draft. I then leave it for 24 hours, and when I come back to it, I always add a little bit extra because I thought of some other points which would be valuable to the reader. A bit of perspective away from your work will always result in more content.
Once you have chosen a keyword for your article – you can see my training on keyword research here – you must place the keyword in the title of the blog post and then once in the opening paragraph. After that just write naturally, and the keywords will be placed in a natural and organic way.
I try not to write anything under 1,000 words. I do occasionally write less but only if the topic of the blog post calls for it – such as a small “How-To” blog post or something like that.
You need to update you blog at least twice a week to get a good standing with Google – especially at the beginning. Once you are established, then you can slack off a little bit.
Internal Links
Internal links are important for a number of reasons;
- They make navigation easier for your reader.
- Makes content more valuable because you are giving more content to readers.
- Good for SEO because internal links help Google map your website.
An internal link is basically a link within your content, which links to another page or blog post on your website. You can see them all over this article – such as the links just above this subheading, to my training videos.
Things to remember when writing content;
- Write at least 1,000-words per blog post.
- Use relevant imagery with title and alt tags.
- Create a relevant video for each blog post.
- Provide as much value as you can.
- Put your keyword in Title of the blog post and once in the opening paragraph.
- Write a fresh blog post at least twice a week.
- Remember to use internal linking to make navigation easier.
How To Put All These Steps Together And Start Making Money Online With A Blog?
Once you have completed the first 6 Steps, you have the foundation for the website ready. From there you simply;
- Do some keyword research to find blog post ideas.
- Write quality content to give value to the reader.
- Add relevant images with title and alt tags.
- Add a related video which will engage the readers.
- Add internal links to other content within your website.
- Share your blog post on social media once it’s published.
- RINSE AND REPEAT!
These are the basic steps to making money with a blog online. Obviously, you can go much for in-depth on all these subheadings but to get the ball rolling – these steps will be enough.
I hope you enjoyed my article and please leave a comment below if you have anything to add. There are more advanced methods out there to add to these steps so please do share them if you have time.